 Save to Pinterest
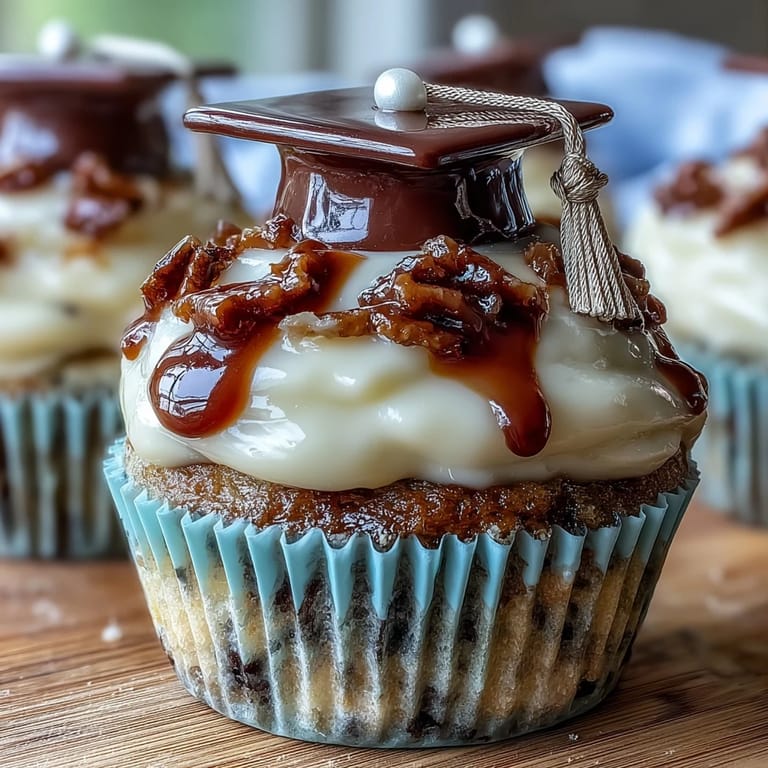
 My cousin's graduation party was supposed to be elegant and understated, but then she casually mentioned she'd always wanted cupcakes with tiny graduation caps on top. I found myself in the kitchen at midnight, melting chocolate and arranging candy pieces like I was decorating a miniature campus. By the time guests arrived, I realized these weren't just desserts—they were edible little celebrations of everything she'd accomplished.
I'll never forget watching my aunt's face when she bit into one and realized the peanut butter cup actually added richness to the whole experience. She started showing everyone at the table, and suddenly these simple cupcakes became the conversation starter that got people talking about memories instead of small talk.
Ingredients
- All-purpose flour: The foundation that keeps these cupcakes tender without being dense; I've learned that sifting really does make a difference if your flour has been sitting in a humid kitchen.
- Granulated sugar: This creams beautifully with butter and creates that light, fluffy crumb you want—don't skip the creaming step even though it feels tedious.
- Unsalted butter: Room temperature is non-negotiable here; cold butter won't incorporate properly and you'll end up with gritty frosting or dense cakes.
- Eggs: They need to be at room temperature too, which I discovered the hard way when my mixture broke because I grabbed them straight from the fridge.
- Whole milk: This keeps the batter moist and tender; I once used buttermilk out of habit and the tang overpowered the delicate vanilla flavor.
- Baking powder: The exact amount matters more than you'd think—too much and they'll dome and crack, too little and they'll be sad little hockey pucks.
- Vanilla extract: Use real vanilla if you can; the cupcakes taste noticeably brighter and more sophisticated with it.
- Powdered sugar: Sifting this before you measure prevents lumps that will ruin your frosting's silky texture.
- Mini peanut butter cups: These become the roof of your graduation cap, adding a surprise flavor moment; switch to chocolate squares for anyone with nut allergies.
- Chocolate square candies: These form the cap's base and should be flat enough to sit steadily; Ghirardelli or Hershey's work equally well.
- String licorice or sour strips: The tassel is what makes these toppers unmistakably graduation caps—the more playful your candy choice, the more personality they have.
- Mini M&Ms or candy pearls: A single piece as the cap button adds a perfect finishing touch of color and dimension.
Tired of Takeout? 🥡
Get 10 meals you can make faster than delivery arrives. Seriously.
One email. No spam. Unsubscribe anytime.
Instructions
- Prep your station:
- Preheat your oven to 350°F and line your muffin tin with paper liners—this takes thirty seconds but saves you from stuck-on cupcakes later. I learned to tap the liners down gently so they don't shift when you pour batter in.
- Cream butter and sugar:
- Beat them together for about two minutes until the mixture looks pale and fluffy, almost like soft clouds. This is where the magic happens; rushing this step means denser cupcakes, so let your mixer do the work.
- Incorporate eggs and vanilla:
- Add eggs one at a time, beating well after each addition so they fully combine. The mixture should look smooth and creamy before you add the vanilla.
- Combine dry ingredients separately:
- Whisk together flour, baking powder, and salt in another bowl—this distributes the leavening evenly. I always use a whisk instead of just stirring because it breaks up any hidden lumps.
- Build the batter gently:
- Add half the dry mix to the butter mixture and stir until almost combined, then add milk, then the remaining dry ingredients. Stop mixing the moment you don't see streaks of flour; overmixing creates tough, springy cupcakes.
- Fill and bake:
- Divide batter evenly among liners—an ice cream scoop keeps portions consistent—and bake for 18 to 20 minutes until a toothpick emerges clean. The kitchen will smell buttery and vanilla-rich, and that's when you know you're close.
- Cool completely:
- Let cupcakes rest in the tin for five minutes, then transfer to a rack; frosting warm cupcakes will melt and slide right off.
- Make silky frosting:
- Beat softened butter until it's pale and smooth, then gradually add powdered sugar so it doesn't cloud your kitchen with a sugar explosion. Add milk and vanilla at the end and beat until it's fluffy and spreadable.
- Frost with intention:
- Use a spatula or piping bag to add a swirl to each cupcake—the frosting should be thick enough to hold shape but soft enough to work with. I like to make small peaks that look intentional.
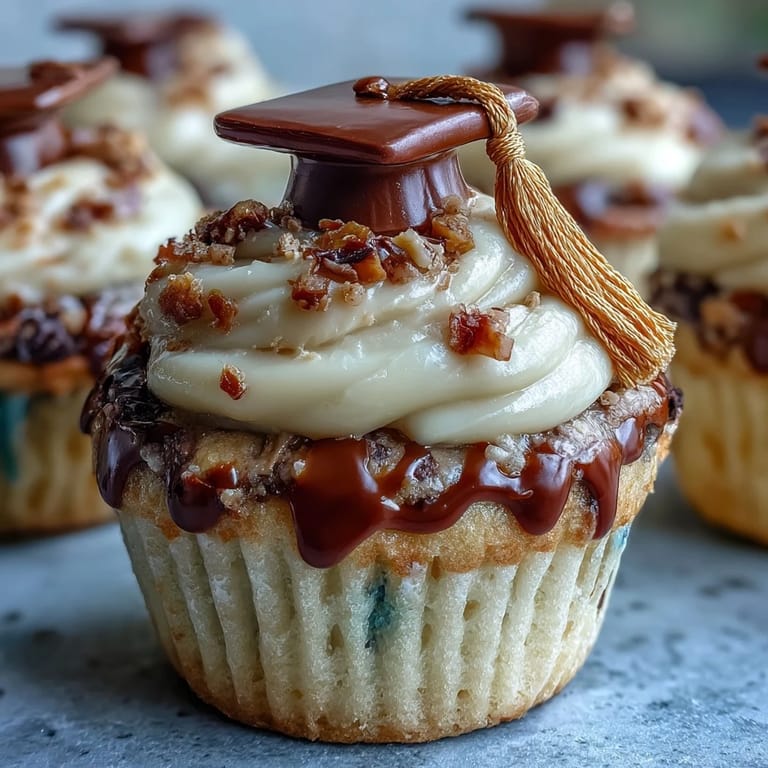
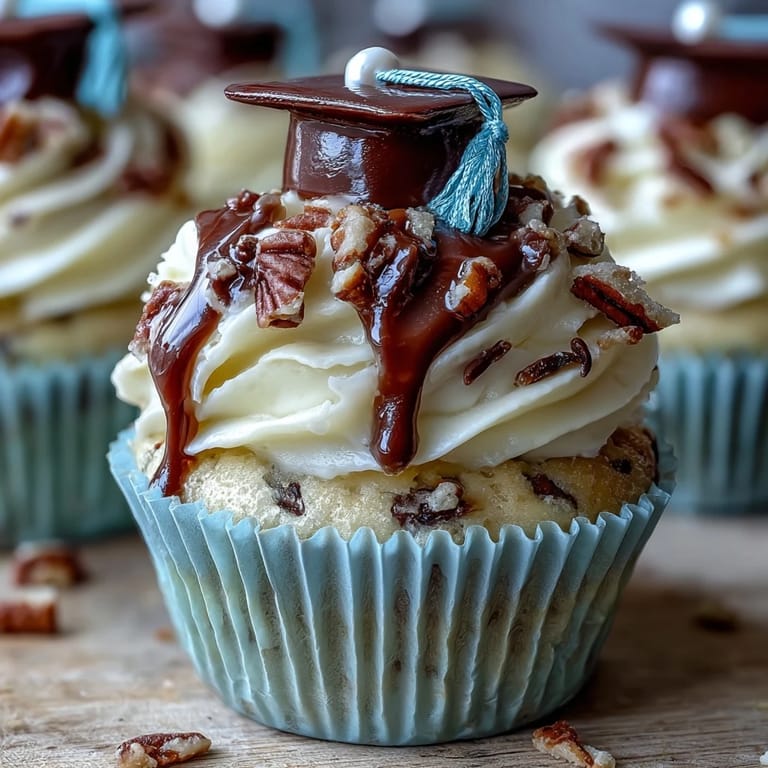
- Assemble graduation caps:
- Place a chocolate square flat-side up and secure a peanut butter cup upside-down in the center with a dab of melted chocolate or frosting. Add a licorice tassel on one side and a mini M&M button on top, then let everything set for at least thirty minutes.
- Crown your cupcakes:
- Gently press each cap into the frosting on top of a cupcake, positioning it so it looks like it's sitting proudly. They're almost too cute to eat, but the contrast between fluffy cake, creamy frosting, and candy layers makes them irresistible.
 Save to Pinterest
 There's something magical about watching someone bite into a cupcake and realize there's a peanut butter cup hidden inside, followed immediately by the realization that the cap on top is also edible. These cupcakes stopped being just dessert and became a moment of joy.
The Beauty of Buttercream
Buttercream might be the most forgiving frosting in the entire baking world. If yours seems too soft, refrigerate it for fifteen minutes and it firms right up; if it's too stiff, add milk a teaspoon at a time until it's spreadable again. I've salvaged batches that looked like disasters simply by understanding this frosting has built-in flexibility.
Scaling and Customization
These cupcakes work beautifully for any celebration once you swap out the cap toppers—I've made them with tiny beach umbrellas for summer parties and little crowns for birthdays. The basic cake and frosting recipe is flexible enough to handle food coloring if you want school colors in the frosting itself, though I find the classic white frosting pairs nicely with any cap design you choose.
Storage and Make-Ahead Magic
Unfrosted cupcakes actually stay fresher longer than you'd expect—I've kept them in an airtight container for three days without any noticeable drying out. The frosted cupcakes are best eaten within two days, but if you need to work ahead, frost them the morning of your event and add the caps just an hour before serving so they stay crisp and fresh looking.
- Keep unfrosted cupcakes in an airtight container at room temperature and frost them the day you serve.
- Store topped cupcakes away from direct sunlight so the candy colors don't fade or the frosting doesn't soften.
- If you're traveling with these, pack them carefully in a sturdy container where the caps won't get jostled loose.
 Save to Pinterest
 These cupcakes celebrate not just an achievement but the joy of marking transitions with something homemade and full of personality. They taste like care and attention disguised as dessert.
Recipe FAQs
- → What ingredients create the cupcake base?
The base combines all-purpose flour, sugar, butter, eggs, milk, baking powder, salt, and vanilla for a tender crumb.
- → How are the cap toppers assembled?
Chocolate squares form the cap top, peanut butter cups create the base, licorice serves as tassels, and mini candies add decorative buttons.
- → Can these cupcakes be made nut-free?
Yes, replace peanut butter cups with chocolate squares and verify candy labels to avoid nuts.
- → How should cupcakes be stored after preparation?
Store in an airtight container at room temperature for up to two days to maintain freshness.
- → Is it possible to customize frosting colors?
Yes, add food coloring to buttercream frosting to match school or event colors.
- → What tools are needed for preparation?
A muffin tin, paper liners, mixer, spatula, and piping bag or spoon for frosting are required.