 Save to Pinterest
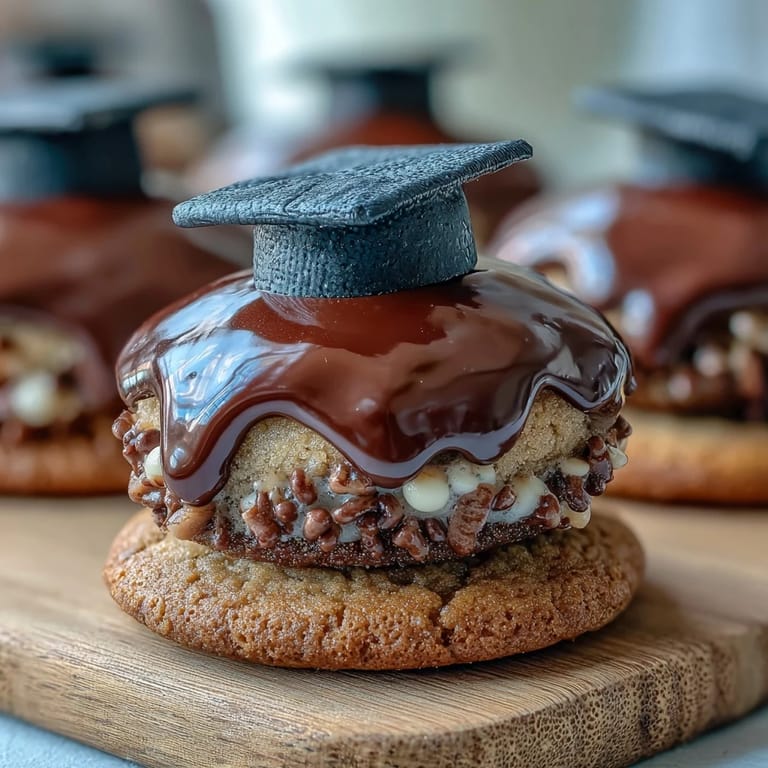
 Last spring, my niece asked me to make something special for her graduation party, and I found myself standing in the kitchen thinking about how to capture that milestone moment in a dessert. These sugar cookies with fondant mortarboards came to life almost by accident—I was playing around with fondant shapes one afternoon when it clicked that a tiny graduation cap would be the perfect topper. What started as an experiment turned into the dessert everyone talked about for weeks, and now I make them for every celebration that calls for a little academic flair.
I'll never forget watching my friend's face when she opened the box I brought to her son's graduation dinner—she picked up one of these cookies and just held it for a moment, admiring the tiny black fondant cap perched on top, before finally taking a bite and grinning. That's when I realized these aren't just cookies; they're little edible keepsakes that people actually want to photograph and keep around.
Ingredients
- All-purpose flour: This is your foundation, and measuring it by weight (315 g) really does make a difference if you have a kitchen scale—it prevents the dense, tough cookies that happen when you pack flour into your measuring cup.
- Baking powder: Just a gentle half teaspoon keeps these cookies tender and slightly puffy rather than flat as a pancake.
- Unsalted butter, softened: Let it sit on the counter until it's genuinely soft; cold butter won't cream properly and you'll end up with a grainy texture instead of that light, fluffy base.
- Granulated sugar: This sweetens the dough and helps create structure, so don't skip it or reduce it thinking you'll use less sugar—the proportions matter here.
- Egg: One large egg binds everything together and adds moisture, so room temperature is ideal for better mixing.
- Pure vanilla extract: Two teaspoons might seem like a lot, but that's what gives these cookies their warm, inviting flavor that makes people ask for the recipe.
- Black fondant: Eight ounces is plenty for creating all 24 little mortarboard tops; if you can't find black pre-made, roll out white fondant and knead in gel food coloring until you reach a deep black.
- Yellow fondant: Those tiny tassels hanging from the mortarboards are what make them feel authentic, so this touch of yellow really completes the look.
- Cornstarch: Dust your work surface with this instead of flour when rolling fondant—flour creates sticky messes, but cornstarch brushes right off.
- Powdered sugar and milk: This simple icing acts as edible glue, holding all your fondant decorations in place while they set.
Tired of Takeout? 🥡
Get 10 meals you can make faster than delivery arrives. Seriously.
One email. No spam. Unsubscribe anytime.
Instructions
- Prepare your workspace and preheat:
- Get your oven heating to 350°F and line those baking sheets while it's coming to temperature—this takes the pressure off later and ensures your first batch goes straight into an oven that's ready. There's nothing worse than cookies sitting at room temperature waiting for the oven to catch up.
- Mix your dry ingredients together:
- Whisk flour, baking powder, and salt in a medium bowl; this aerates the flour and distributes the leavening evenly, which is the quiet work that makes great cookies. I like to use a whisk instead of just stirring because it actually breaks up any little flour clumps.
- Cream butter and sugar until fluffy:
- In a large bowl, beat softened butter with granulated sugar for about 2 to 3 minutes—you're looking for a pale, almost fluffy texture that's noticeably lighter than when you started. Electric mixer is really the way to go here; hand mixing takes forever and doesn't incorporate enough air.
- Add the egg and vanilla:
- Drop in your room-temperature egg and pour in the vanilla, then beat until everything is combined and smooth. This should take maybe a minute—you're just bringing it all together, not overworking it.
- Combine wet and dry ingredients gently:
- Add your flour mixture to the butter mixture a bit at a time, stirring just until you don't see any white streaks of flour—overworking the dough here is the quickest path to tough, dense cookies. I always stop and do a final stir by hand to make sure nothing's hiding at the bottom of the bowl.
- Roll and cut your cookies:
- Lightly flour your work surface and roll the dough to about 1/4-inch thickness, then cut out 24 shapes using round or square cutters (2 1/2 inches is the sweet spot). If the dough gets sticky or warm while you're working, pop it in the fridge for 10 minutes—dough that's cold cuts cleanly and holds its shape better in the oven.
- Bake until golden:
- Place your cut cookies on parchment-lined sheets and bake for 10 to 12 minutes until the edges just barely turn golden—they'll continue to cook slightly on the hot pan even after you remove them. The centers should still look almost underbaked when you pull them out; they'll firm up as they cool and stay tender instead of hard.
- Prepare your fondant decorations while cooling:
- While cookies cool completely on a wire rack, roll out that black fondant to 1/8-inch thickness and cut 24 small squares about 1 1/4 inches each for the mortarboard tops. Roll 24 tiny cylinders (about 1/2-inch long) for the bases, and create thin yellow ropes to cut into 1-inch tassel pieces.
- Make your icing adhesive:
- Mix powdered sugar, 1 to 2 tablespoons milk, and vanilla until you get a smooth, spreadable consistency—it should be thick enough to hold fondant in place but thin enough to work with a small brush or the back of a spoon. If it's too thin, add more powdered sugar; too thick, add milk a few drops at a time.
- Assemble each cookie decoration:
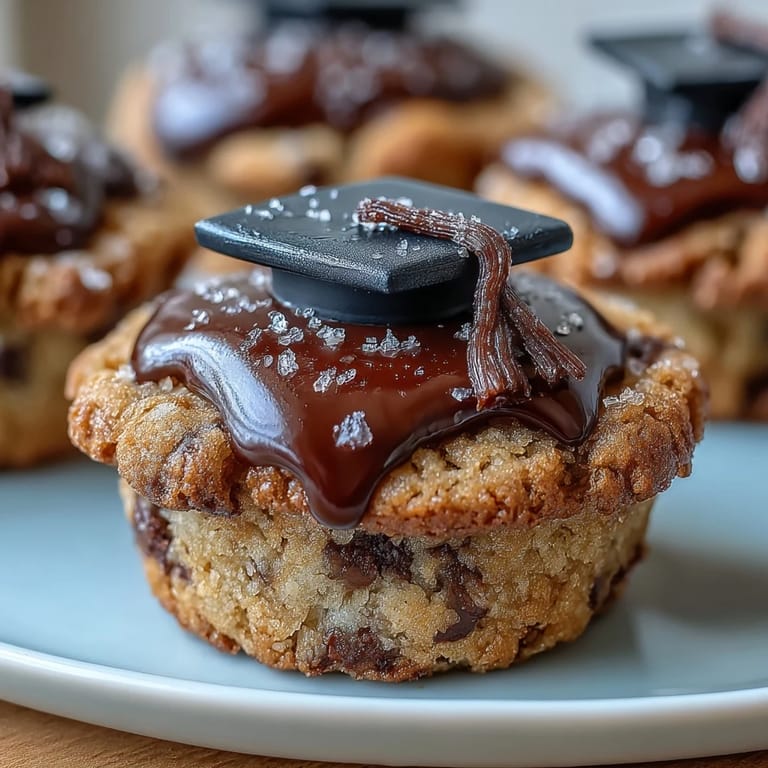
- Use a tiny dab of icing to attach a fondant square to the center of each cooled cookie, then position a fondant cylinder underneath it as the base—this creates that 3D mortarboard effect. Add a yellow tassel to one corner with another dab of icing, angling it so it looks like it's swinging slightly.
- Let everything set before serving:
- Give your decorated cookies 20 to 30 minutes of rest time so the fondant and icing harden and the decorations stay put. Once they're set, they're ready to serve, gift, or package up beautifully.
 Save to Pinterest
 There's a particular joy in watching someone bite into one of these cookies at a graduation party—that moment when they encounter the crispy sugar cookie base and then realize the fondant mortarboard is actually edible, not just decoration. It's those little surprises that turn a simple dessert into a memory.
Customizing Your Cookies for Any School or Event
The beauty of these cookies is how easily you can personalize them to match school colors or the graduate's personality. I've made batches with fondant mortarboards in navy blue, maroon, even that trendy teal color—just pick up food gel coloring and knead it into white fondant until you get the shade you want. The tassels can match or contrast, and if you want to get really fancy, you can pipe the graduate's initials onto the cookie base with a little royal icing before adding the mortarboard.
Storage and Make-Ahead Strategies
I typically bake the sugar cookies a day or two in advance and store them in an airtight container, which actually lets them become a tiny bit softer and more delicious. The fondant pieces can be shaped ahead too—just keep them in an airtight container away from humidity (or they'll get sticky) until you're ready to decorate. The assembled, fully decorated cookies stay fresh for about five days in an airtight container, which means you can actually make these the day before a party if life gets hectic.
Quick Hacks and Shortcuts Without Sacrificing Quality
Life happens, and sometimes you need these cookies faster than planned. If you're short on time, there's absolutely no shame in starting with quality store-bought sugar cookie dough and just focusing your energy on creating those beautiful fondant mortarboards—people will still be impressed. Pre-colored fondant exists specifically for situations like this, and using it doesn't make your cookies less special; it just means you get to sleep the night before instead of stress-baking at midnight. You can also buy fondant squares and tassel pieces if they're available at your local cake decorating supply store, though hand-shaping them is honestly pretty quick and therapeutic once you get the hang of it.
- Chill your dough for 20 minutes if it gets warm and sticky during rolling—this takes just a few minutes and prevents frustration.
- Use a cookie scoop for uniform sizing, which means even baking and a more professional-looking finished product.
- Keep your fondant covered with plastic wrap while working so it doesn't dry out and crack.
 Save to Pinterest
 These cookies have a way of making any celebration feel a little more special, whether you're serving them at an elegant graduation party or tucking them into a care package for someone starting a new chapter. Every cookie is a small, delicious reminder that milestones deserve to be savored.